Alfa Romeo 4C Forums banner

DIY - Center Console Disassembly

34K views 67 replies 28 participants last post by  LP560-4C  
#1 ·
Start with the 1/N/R/A/M selector panel.


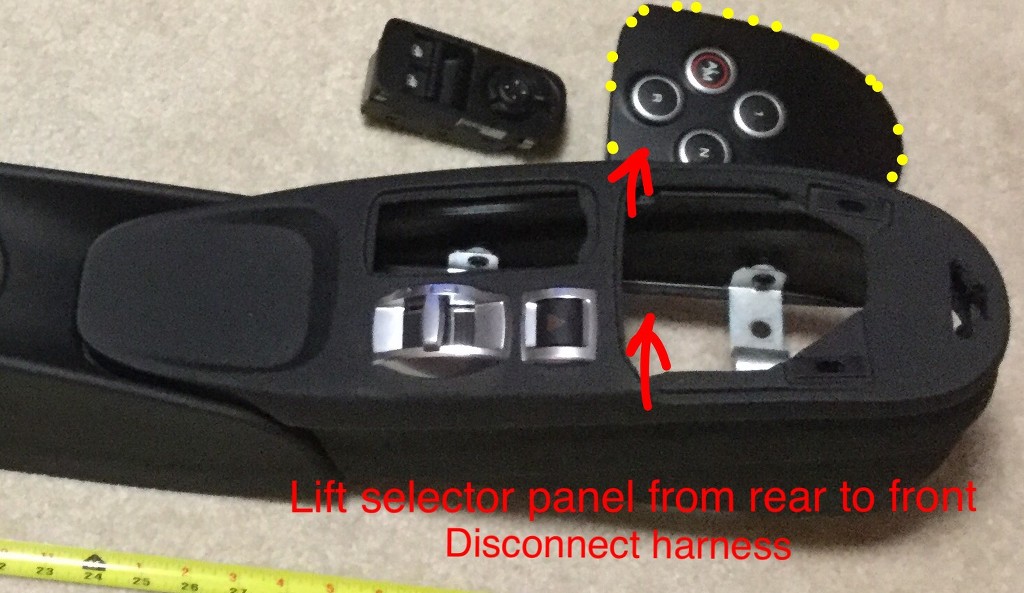
Pop out window/side mirror switch panel from underside from now removed selector panel. Disconnect harness.


Locate the 4 10mm mounting posts with nuts. Carefully lift up that console piece and turn over to be able to access and disengage the Hazard and DNA selector harnesses. There is a guide pin at the rear of that console piece that seats and aligns that front piece with the rear piece.


Undo and detach ebrake boot

 
#2 · (Edited)
Either unscrew 2 10mm nuts at front of rear piece or locate and remove rear Torx screws....


Carefully remove the rear console piece after disconnecting 12V power plug harness...
 
#30 ·
Either unscrew 2 10mm nuts at front of rear piece or locate and remove rear Torx screws....


Carefully remove the rear console piece after disconnecting 12V power plug harness...
106580

There are 6 x 10mm nuts (red arrows) and 1 clip (yellow arrow).

106581

The nut at the right bottom is hard to do. I used my fingers as the above photo.
 
#3 ·
For removal of the forward pieces that surround the post under the HVAC, follow these removal steps. IF you want to remove the aluminum kick plate in the passenger foot well for whatever reason, you will need to remove these 3 pieces. The reason for this is there is a large head Phillips screw on the upper left of the kick plate hidden under the foremost console piece.


#4 ·
These are pictures of the 5 harnesses that need disconnected when disassembling the center console. The only one I am certain of which one goes to which plug is the 12V power plug. Because the console pieces and controller panels are with Shawn to get laid with CF and then switch panels get test fitted into the newly CF laden console pieces for perfect fitment, I do not have all the controller panels with harness plugs at this time. Once I get all the console pieces and control/switch panels back from Shawn, I will update the harness association. :)


One is the 1/N/R/A/M selector panel harness and the other one is the DNA selector switch harness:


One is the Hazard light harness and the other one is the window/side mirror control harness:


12V power plug harness:
 
#9 ·
I need to tap an accessory 12V source in the cabin and was aiming to tap the 12V plug harness. Do you know which wire is the 12V source and which is the ground? Alternatively, is there another spot to source ACC power and ground (for reverse mirror power).
 
#10 ·
Here is a picture of the 12V plug. Black is ground, grey/red stripe is power and blue/white stripe is remote on. I would verify this with a volt meter.


What about tapping the cabin light up by the mirror? That is where I tapped to hardwire my radar detertor power wire. Only problem is the power wire up there is constant on so I have to unplug my RD everytime I leave the car.
 
#11 ·
Hey Docron,

Can one replace the 12V outlet COVER from above, or does one have to remove the console to accomplish this?
I broke the lid off mine at the hinge a long time ago. The hinge is fubar'ed.
Have the replacement part (resembles a toilet seat/lid combo), but not sure if/how this is done.

Any words of wisdom based on your experience?
 
#12 ·
Hey Docron,

Can one replace the 12V outlet COVER from above, or does one have to remove the console to accomplish this?
I broke the lid off mine at the hinge a long time ago. The hinge is fubar'ed.
Have the replacement part (resembles a toilet seat/lid combo), but not sure if/how this is done.

Any words of wisdom based on your experience?

I don't think you can just replace the 12V plug *cover*....you would probably have to replace the entire 12V plug. And that would have to be done from the underside which would require removing the whole center console. The 12V plug is held in by pinch clips.


Why not fill it with something like this?
http://www.dx.com/p/cool-devil-style-resin-car-cigarette-lighter-black-dc-12v-140813#.V6DS0f3r3IU
 
#14 ·
Going to the top of the thread and step/picture 1:
Start with the 1/N/R/A/M selector panel.
Lift selector panel from rear to front.


Do you mean lift from the rear of the car to the front of the car...or rear of the panel to front of the panel?


I will be attempting this and don't wish to snap clips on step 1. lol
 
#19 ·
If you pull *hard enough*, it should come loose.... ;) (seriously, dont pull hard enough)

Image


Hope this helps Matt... :)
 
  • Like
Reactions: Mateus and 4Canada
#24 ·
DOCRON, thanks for the write-up. Used this to take apart from kick plate back to firewall. Have a blackvue dr900s 2ch and b124 battery that deliver tomorrow. Everything is sitting in the garage waiting for install thanks to your guide.


Felt the need for a dashcam after a semi started coming through a turn at intersection and his driver wheel was focused on the center of the car. I laid on horn and he started brushing things from bottom part of windshield as he apparently hadn't seen me until then. At least now next of kin will have proof of what happened to us.
 
#26 ·
Backside of the actual selector plate as in the underside of buttons
(Just buttons on the plastic plate)

OR

The IC board under the buttons?
Image
 
  • Like
Reactions: 4Canada
#29 ·
Hi .... what happened to the pictures on this thread?

Was looking to remove the center console.
Hey there, @massimo4c ,
Although the links appear to be broken - no idea why, but if you click on the boxes where the pictures were, you can still get to them on imageshack.
At least I was able to.

Let me know if you cannot and I can try to fix things. Just really swamped at work this week.

Good luck!
 
#36 ·
Eternal addiction for scientific and operational analysis? 😷
 
  • Like
Reactions: Sir5n